Welcome to the June 2019 SMF Soap Challenge – Rimmed Soap
First, I must apologize for the delay. Due to technical difficulties, I will not be able to include the video I was was making for this challenge. If I overcome the technical difficulties, I will add it later. But in the meantime, here we go...
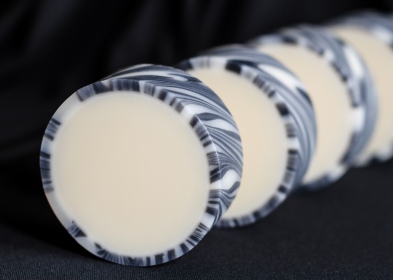
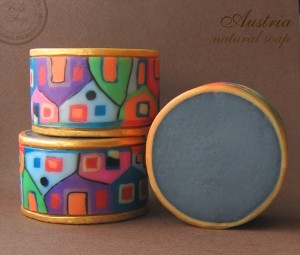
If you choose to participate, you will be creating soap with an outer Rim which is made separately from the inner portions of the soap, using any method you choose from those listed below.
PLEASE BE SURE TO READ THIS FIRST (and ALL Rules)-
General Rules:
1. The only members eligible to vote are those with their names on the sign up list - regardless of whether or not you have submitted an entry.
2. This month’s voting will be password locked. Passwords will be sent (via SMF Conversations) to all registered participants ONLY. So please check your messages when the voting begins.
3. No posting your entry photos until the entry thread is made. Non-entry photos are very welcome!
4. You are allowed to change your entry photo up until the entry thread closes. So if you decide after you post your entry you want another try, and you like the second better, you can change it up until the deadline.
SMF Challenge General Rules
· To enter you must have a minimum of 50 posts and been a member for a month (sorry but no exceptions on this)
· Please add your name to the sign up list if you wish to participate (however, you don’t have to enter a soap at the end if you don’t feel happy with what you have produced)
· The challenge thread should be used to upload pictures of any of your challenge attempts where you can ask for advice and discuss the technique with other members.
· Constructive criticism is welcomed, but please try to keep your comments polite.
· Competition entries must be uploaded to the separate entry thread before the closing date. The Entry thread will open on June 22, 2019 (Please follow the challenge specific rules as to what you need to enter)
· After the closing date June 26, 2019 at 11:59 pm CST the winning entry will be chosen using survey monkey (Voting will be open from June 27, 2019 through June 29, 2019) and the winner announced on June 30, 2019. There is no prize attached to this challenge.
· If you fail to make the challenge deadline, you are still welcome to upload your soap onto the thread, but your entry will not be eligible for voting. We still love to see anything you have produced.
· Even though there is no prize, this is still a competition. If your entry is deemed not to fulfill the general rules or the rules specific to the challenge in any way, then you will be given the opportunity to amend your entry. If this is not possible then your entry will not be included in the voting.
· All the challenge mods reserve the right to have the final say on whether a soap is eligible for for voting.
-------------------------------------------------------------------------------------------------------------------------------
The June 2019 SMF Challenge is Rimmed Soap.
Rules for this month’s challenge:
Create a Rimmed Soap using CP, HP, or MP, or combination. It can be any shape you choose, round, rectangular or whatever shape works for your design. However, the Rim of the soap must surround the outer perimeter of the finished soap. For a round soap, the outer RIM obviously circles an inner circle of soap, while in a polygonal shaped soap, the RIM is continuous around the outer perimeter of the soap as it is viewed as a two-dimensional shape. For other shapes, such as flower petal type shapes, the Rim would still be around the outer perimeter of the mold as it is viewed from the two-dimensional standpoint. See examples below.
Your Rimmed soap may be made in a multi-bar mold and cut into multiple bars, or it may be made in an individual mold, one soap at a time.
The outer Rim is made separately as a flat soap, then shaped to fit into the outer perimeter of the soap mold. The inner portion is added to complete the soap. The outer Rim may have seams, but every attempt should be made to create a smooth seam rather than a seam that has an obvious gap. The inner portion can be plain, multi-colored and/or include embeds if you choose.
You may enter a group of soaps in one photo, or choose only one soap as your entry, but choose one entry photo, please.
When you enter your soap on the entry thread (which will be posted on June 22nd) please feel free to include a description of your creative process.
TOOLS that may be useful in making/preparing the RIM:
Shallow tray lined with Freezer Paper (for single layer Rim)
Log or Slab mold (a thin layer for one Rim or thicker soap to cut for multiple RIMs)
Cutter (for slicing thin layers for Rims when using a thicker molded soap) – suggestions below*
Knife or slicing tool to trim the edges of the seam(s) for the RIM
Dowel or other tool for smoothing the Rims prior to filling with core soap batter
Cutter for Thin, even RIMS ideas/suggestions:
* loaf or soap cutter with adjustable height for cutting wires
* DIY hand-held wire (see video below on how to make one)
* mudwire or wire clay cutter
* see tools used in tutorials and videos for more ideas
INSTRUCTIONAL VIDEOS and TUTORIALS
Create the RIM:
Rims may be as colorful and as intricately designed or as plain as you choose. Some contrast between the Rim and the center portion of the soap creates interest.
The soap made for the RIM must Gel in order to maintain pliability when manipulating the thin layer to conform to the shape of your mold. Some add extra castor oil & some add glycerin to increase pliability of the Rim and help prevent cracking.
Additional tutorials:
DIY hand-held wire knife video (clay cutter, but can be used to slice soap)
Alaiyna B has a very good tutorial on how to create a single outer rim in a slab mold.
http://alaiynab.blogspot.com/2015/10/rimmed-soap-tutorial.html
Holly – Kapia Mera Soap’s video of making & cutting the rim with a DIY wire cutter made with corks:
Yuri Kuma: Group cutting multiple Rim slices with a another DIY wire slicer:
Melt and Pour Rim tutorial by Tatsiana Serko (Steso):
http://bysteso.blogspot.com/2015/07/blog-post_22.html
You may also choose to do straight-sided Rimmed Soaps. To get a really nice mitered edge on the corners of the Rim, I chose to cut the corner edges of the Rims at an angle to provide a mitered corner, which I thought looked nicer. I will include some examples of straight-sided Rimmed soaps below.
MJR Soaps Rectangular Rimmed Soap video:
An alternative to the traditional Rim, is the Side-Wall method used by Lisa at Blossom and Birch Soaps, a method she reports that she has used since about 2005. She uses shredded soap that she creates using a salad shooter, puts them into a plastic baggie and heats (as in the Sous Vide method we used in a previous Challenge), then a rolling pin to flatten the contents to create the ‘Side Walls’ for the soap. Then fills the inner portion just as done in the traditional Rimmed Soap. Below are some videos for the Side-Wall soaps from Blossom and Birch Soaps. My only caveat is that for this Challenge, if you choose to use this method, you will still need to have walls make up the entire outer perimeter of the soap with smooth seam transitions, which might be harder with this method. In other words, if you do a 4-sided shaped soap (square, etc.), then the 4 outer sides of the soap must be rimmed, hopefully with smooth seams. Unfortunately, I think the side panel technique does not lend itself well to curved molds.
Side Wall method by Lisa at Blossom and Birch Soaps:
continued in next post (here)
Thank you for participating and please sign up using the sign-up sheet below.
Enjoy!
Last edited:


