I found this one online.
Recipe for Bubble Bars
Difficulty: Easy
1/3 cup of cream of tartar
1 cup of baking soda
1 cup of sodium lauryl sulfoacetate SLSA (powdered foaming agent)
1/3 cup (more or less) of glycerin liquid
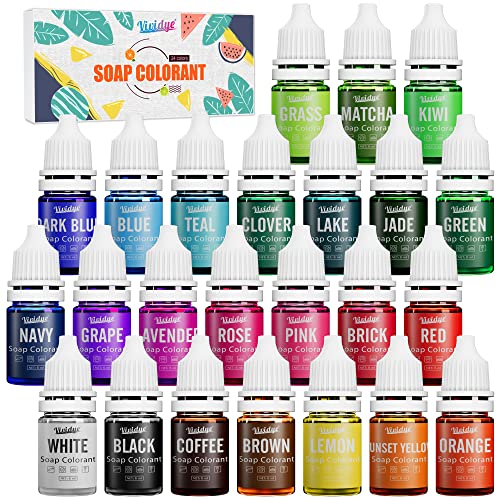
A few drops of water-based soap colorant
Fragrance or essential oil
A loaf pan or other mold large enough to hold all the mixture
Step 1. Go shopping for your ingredients. Some you may already have in your pantry, and some you can pick up at your local grocery store. The rest can easily be purchased online at a soap making supply Web site (see below).
Step 2. You will need a clean, clutter free work space to make your handmade solid bubble bath. The kitchen counter or table works perfectly.
Step 3. Wash your hands thoroughly. You will be using them to mix and mold the solid bubble bath bars and you don’t want to transfer bacteria from your hands onto your handmade Christmas goodies. It’s also recommended to wear thin kitchen gloves if you’re worried about staining your hands when they come in contact with the liquid colorant.
Step 4. Mix all of your dry ingredients into a large metal or glass mixing bowl. Using your hands as sifters, thoroughly blend the dry ingredients together and remove any lumps.
Step 5. Add your liquid colorant. Don’t add too much as even high quality soap colorant can stain tubs and skin if used in excess. Instead, aim for a light to medium pastel shade. It’s always nice to try and match your color with the fragrance you plan on using. For instance, if you're making Lavender scented bubble bath, use a little purple colorant.
Step 6. Add your fragrance. Start with approximately 25 drops of fragrance oil from an eye dropper and mix the “dough” well with your hands to incorporate the color and fragrance. Give your solid bubble bath a sniff test and add a little more fragrance if the scent isn’t strong enough for you.
Step 7. The last ingredient to be added is the liquid glycerin. Pour this in slowly, small amounts at a time, and mix thoroughly until the mixture holds together in your hand (similar to dough).
Step 8. You are now ready to transfer your solid bubble bath to a loaf pan. Press the bubble bath dough firmly into the loaf pan to help the mixture hold together better while drying. Let the dough sit in the loaf pan for approximately an hour to allow it to begin to set up.
Step 9. After an hour you can carefully remove the bubble bath loaf from the mold. If it is too dry and crumbly return the mixture to the bowl, add more liquid glycerin and mix thoroughly. Return to the loaf pan to set up for another hour.
Step 10. Once the bubble bath loaf is firm enough you may begin to cut it into small cubes or slices. Use a sharp knife or a dough cutter and cut into either thin bread-like slices or into cubes approximately the size of a standard ice cube or a little larger.
Step 11. Place these pieces on a wax paper lined cookie sheet and allow them to cure and harden overnight.
Step 12. Once the solid bubble bath bars have hardened, they are ready to be wrapped. Use clear cellophane for wrapping to protect the solid bubble bath from humidity. Always store your solid bubble bars in a cool, dry place. Try to use within two to three months for best results.


")
