SMF January 2017 Challenge: Gradient Layer

Soapmaking Forum

Help Support Soapmaking Forum:

This site may earn a commission from merchant affiliate links, including eBay, Amazon, and others.
Thanks for the nice comments everyone, I really enjoyed painting the soap. I used to do ceramics so it was just like getting out the ceramics and paint from back in the day. I loved doing the detail work on it, but the soap itself really was a disaster. For some reason it was really soft and mushy at the bottom two layers. I'm wondering if there was too much mica and that caused that effect. Also, because there is so much colorant in the soap, it bleeds pepto bismol in the sink. BIG TIME! I had theses pasty chunks of pepto in the sink. I'll leave it on the shelf for a few months to see if that helps harden it. If not, I'll just toss it out. It was only about 1000 grams of oils, so it wasn't a major loss. There weren't any butters or expensive oils in there, either, so that's a plus.

I made my entry soap in the same mold and painted the top again. I used a lemon fragrance and "lemon chiffon" mica for the first three layers and added a bit of orange to the last two layers. However, you can't really tell there's any orange in it. I was hoping it would show. I've already posted my entry photos (some day I'm going to buy a camera). But here are a couple of other photos. The first is what the soap looks like after it is unmolded. The second is a better shot of the detail work on the butterfly. I think I've found my calling: painting soap. This time I used olive oil with the mica and it was much easier to work with. I still need to buy some decent paint brushes, though. I also ordered two more of those molds. I'm probably going to be looking for highly detailed molds in the future.

ETA: I tried to outline the wings in black again, but didn't feel like mixing new mica with oil, so I used the mica/glycerine from yesterday. It beaded as you can see in the photo. I'm hoping that by tomorrow the beading will have absorbed into the soap and the mica will have left the outline that I was looking for. Because of this, I didn't bother to do the dots and lines on the ladybugs. I'll do that tomorrow after everything absorbs into the soap. Also, in this photo, you can barely tell the differences in the layers. I actually had to turn the overhead light off in order to get the shot for the entry photo.

Naked Soap.jpeg


Orange butterfly.jpeg
 
Last edited:
Wow Teresa, I am super glad the gradient worked better for you in the second batch. The tops of both batches are, well, simply over the top! I have never thought much about brushing tops but now you have my mind going!

Mommy and Judiraz - your soaps are lovely as well. I'm glad to see the entries growing in beauty!
 
Teresa you did such a good job painting the top of that soap, and your gradient is so subtle and soft - but there. Looking forward to seeing more painted soaps from you!

Judiraz, it's nice to see you back in the challenges. Your entry is lovely.

mommycarlson I'm glad you entered your soap. I love the blue and your sculpted top is so well done.

redhead, I love everything about your whimsical cake - right down to the candle matching the colors of the soap. Well done!

artemis, it was fun to hear how you chose your colors based on the scent. I wish I could smell it, and the colors for mint chocolate chip are perfect! I'm also glad there is no ice cream in the house right now!
 
Dibbles and CaraBou, thank you! :) I am amazed at the talent on this forum, so many pretty soaps, so many colors and different ideas. You are a talented bunch!
 
As ever I'm in awe at the talent on show!

My one and only attempt didn't do what I wanted it to. I used a discolouring FO in varying amounts to try and create my gradient but it just hasn't worked. The more it discolours the more each layer looks the same.

I used a chocolate truffle FO for the gradient and peppermint EO for the top green layer.

It doesn't look how I wanted it to but it smells amazing!! And it was great to make soap after months off.

ImageUploadedBySoap Making1485302626.137574.jpg
ImageUploadedBySoap Making1485302664.143609.jpg
 
I can see the shading getting increasingly darker from the bottom up, more evident in the first picture. I bet with a bit more time, it will be what you wanted it to.
 
This was my 2nd attempt at the challenge. I've only been soaping since taking a class in late October but wanted to try it anyway. Is this ricing? Or something else? I was having a lot of trouble with this batch already before the power went out in the middle of it, leaving me in the dark in a windowless building.

IMG_5198.JPG
 
This was my 2nd attempt at the challenge. I've only been soaping since taking a class in late October but wanted to try it anyway. Is this ricing? Or something else? I was having a lot of trouble with this batch already before the power went out in the middle of it, leaving me in the dark in a windowless building.

Yikes! How did you finish in the dark? I had the power go out once, but I had just finished my soap and was at the top of the stairs from the basement (where I soap). That was bad enough.

I don't know about the ricing issue. Was the batter ricing before you poured it?
 
Steve, how can you call that a near fail? I think the colors look perfect, and your layers are so straight...I really like it. A lot. Really.
It just wasn't what I was trying for.
What came out works. It even has that bastile ( uncured) slime.
I was hoping for a little different set of colors without the "drifting" between layers. It does make the layers stand out though.
This is a technique that I am more than willing to try some more. I'm sure it'll get in there with the ITP, Cosmic and drop swirls.:)
 
Yikes! How did you finish in the dark? I had the power go out once, but I had just finished my soap and was at the top of the stairs from the basement (where I soap). That was bad enough.

I don't know about the ricing issue. Was the batter ricing before you poured it?

Dibbles, I felt my way to the door so I could open it for some natural light. I'd reached the point of coloring the 2nd or 3rd portion of the batter so I can't blame that for the soap as a whole.

The batter had had some slight clumps, for lack of a better word, in the mixing bowl, so I SB it more before separating the batter. It was smooth when I separated it. The batter did harden more quickly than I expected, and the 1st color was much lighter in the batter than I'd anticipated so I had to adjust all the colorant amounts, further slowing the process. Despite the batter thickness, I stirred (ha! "strong-armed" is more like it) in all the colors and glopped each layer down. It was still smooth when I applied the last color and smoothed the top before covering the mold.

It's my go-to recipe I've used a lot and I've not had this kind of problem before.
 
OK still no banana! lol - I tried again but I just cannot get these lines straight. I think I got it right on the graduation of colors ( camera is distorting the true color) except the 2nd one, doesn't seem to show much difference. I filled my cup with 16 oz of Dark Green and poured 8 into the mold. Then filled the container back up to the 16 oz mark with more batter and poured off 8 again. filled it back up to 16 oz and poured off 8 again and so on. I think its the slow recipe I used as each layer took forever to get thicker so it would support the next ( even though it didn't do that well) But you know practice makes perfect. Ill keep trying.

All of the entries are great!

gradient.jpg
 
OK still no banana! lol - I tried again but I just cannot get these lines straight. I think I got it right on the graduation of colors ( camera is distorting the true color) except the 2nd one, doesn't seem to show much difference. I filled my cup with 16 oz of Dark Green and poured 8 into the mold. Then filled the container back up to the 16 oz mark with more batter and poured off 8 again. filled it back up to 16 oz and poured off 8 again and so on. I think its the slow recipe I used as each layer took forever to get thicker so it would support the next ( even though it didn't do that well) But you know practice makes perfect. Ill keep trying.

All of the entries are great!

Looks great to me and you should enter it!
 
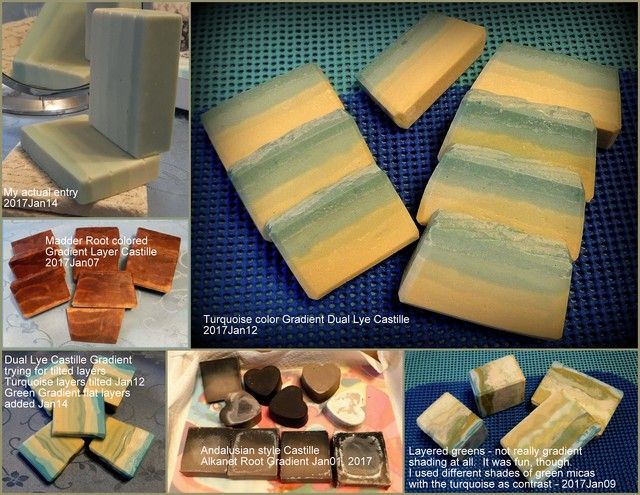
I made several attempts for this challenge, submitting the very last one, as I felt it best met the criteria. This was a lot of fun and really helped me learn to make straight layers eventually. It took several attempts before they became straight as you can see from the following photo collage.

Castille%20Gradient%20Layer%20Soaps%202017Jan%20Collage%20002.jpg


The Andalusian style Castille has Alkanet root and the layers are barely visible with all the ash, but they certainly weren't straight. I made that one on Jan. first. The next one was plain without color, so it's not in this collage. The next gradient attempt was on Jan 7 with Madder Root. The color is rather darker than it appears in the photo and there is something about madder root that seems to make the soap feel harder, interesting. Anyway the layers aren't so very nice, not at all straight and the color gradient is really lacking, as it was with the Alkanet root. On Jan 9th, I did more of a color layering than a gradient, not realizing that this was not the best method, I used different shades of green micas I had with Turquoise for a contrast. Not straight by any means. Interesting, but it has lots of ash. I also added salt to this soap, it might contribute to the ashy look. On the 12th I tried doing a tilted gradient layer of a real gradient using turquoise as the base color, but the tilting technique was a bit beyond my skills. I will try it again sometime and maybe perfect it, since it took so long just to get straight lines at last; I think I can perfect titled layers, too with a little more practice. I actually poured two molds on the 12th. One was to attempt the tilt and only filled the mold halfway, so I didn't finish that one until the 14th when I added more to it. The other mold I did on the 12th was simply straight Turquoise gradient, pictured in the picture on the top right. On the 14th I finally got the straight layers perfect in my final Dual Lye Castille using the oven for a few minutes between layers to hurry along the set up between layers. I also finished up the soap in a small wooden recipe box mold where I had started the tilted layers. That two-day soap is pictured on the bottom left.
 
Last edited:
Even though there is one cohesive theme, everyone's entries are so different and no two entries even come close to resembling each other. This has been so much fun seeing all of the different creations as told through individual's eyes, and every single one has inspired me in some way. Nice work, all of you!
 
Dang it, I missed the cutoff for entry this month so i'll post my attempts here. I was having a hard time choosing which one to enter. I used Nurture's Frangipani Jasmine FO for batch #1 and Nurture's Juicy Apricot for #2. They both smell awesome but #1 got a major case of soda ash after I took the initial pics.

1485391233485.jpg


1485391243744.jpg
 
Last edited:
Dang it, I missed the cutoff for entry this month so i'll post my attempts here. I was having a hard time choosing which one to enter. I used Nurture's Frangipani Jasmine FO for batch #1 and Nurture's Juicy Apricot for #2. They both smell awesome but #1 got a major case of soda ash after I took the initial pics.

I'm sorry you missed the cutoff, both of your soaps are lovely. I think I like the pink one a squidge more.
 
Back
Top