Intersting video on how to get rid of ash

Soapmaking Forum

Help Support Soapmaking Forum:

This site may earn a commission from merchant affiliate links, including eBay, Amazon, and others.

MeadowHillFarmCT

Well-Known Member
Joined
Apr 20, 2011
Messages
387
Reaction score
1
I thought this was awesome and liked to share - maybe it can be a sticky

[ame="http://www.youtube.com/watch?v=I3WiX6sD-fY&feature=related"]http://www.youtube.com/watch?v=I3WiX6sD ... re=related[/ame]

Here is another using a teapot..
[ame="http://www.youtube.com/watch?v=uqzFLY967vI"]http://www.youtube.com/watch?v=uqzFLY967vI[/ame]
 
I saw this and tried it week before last. It works well, though it takes some time and the bars get very slippery in your hand. My bars are still ash free. Great technique.
 
I liked the first video - the more comparison video... Shows each technique and how they worked.

I have a steam buggy and think that would be easier than the tea pot method. Especially, with my textured tops.
 
This is the video I saw: [ame="http://www.youtube.com/watch?v=RDlV0vUN6e8"]http://www.youtube.com/watch?v=RDlV0vUN6e8[/ame]
 
Thank you so much for posting this! I made soap a couple of weeks ago and it's the first batch I've had ash on. I thought I was going to have to cut the ash off and make the bars smaller but now I can't wait to try this trick. I actually have a hand-held Shark steamer that I use to clean my fixtures in the kitchen and bathroom. It will be perfect for this. I will just line the soaps up and give them a good steam tomorrow.

Funny the video mentioned ash can form if there is humidity in the air. My husband actually had a humidifier running that week between the living room and kitchen because the house was so dry. Now the humidifier is upstairs. I'll be sure not to have it near me when I make soap again!

I'll take pics to show you all tomorrow afternoon. I am so excited to learn this steam trick! Thank you!
 
very interesting, if the beeswax worked that would be great and save alot of trouble later. It would be worth trying. Thanks!
 
The first video starts off on the wrong foot. Ash isn't caused by impurities in the lye floating to the top, but by lye coming in contact with air.

For this reason, I strongly doubt all information presented in that video. For example the molecule density thingy and humidity matter. Or they could be right about last one one - maybe if the humidity is high enough to cause sweating.

*********************

The steaming method is interesting. I didn't understand from the second video what she means by "bubbling".

I did try it, and the results are encouraging.

For a thin layer of ash, a light steaming is enough.

A thicker layer is more tricky:
- you need to achieve more of a steam cleaning
- the ash may melt and flow/migrate to another area of the soap

I've tried the pot method, with a little steam cleaner and next time, I'll try a steam cooker.
 
Fragola said:
Ash isn't caused by impurities in the lye floating to the top, but by lye coming in contact with air.
The lye reacts with carbon dioxide in the air during manufacture and storage, not only when it is in soap. That's why these salty impurities (mostly sodium carbonate) are present in our soap batter.
 
I saw MeadowHillFarmCT had posted the vids in another thread, so I gave it a try last night on some of my soaps with the thickest ash.
I thought I'd post my results, so everyone could see that it did make a big difference. I have a Shark steamer, and it was a bit sticky working with the soap, but I think the end result is worth it!
Before:


Uploaded with ImageShack.us

After steaming:


Uploaded with ImageShack.us
These are dried overnight, they are left with a nice sheen instead of ash, hopefully you can tell from my photos!
 
Fragola said:
The first video starts off on the wrong foot. Ash isn't caused by impurities in the lye floating to the top, but by lye coming in contact with air.

Assuming that the white stuff is really sodium carbonate to begin with. According to Dr. Kevin Dunn, sometimes it's not. Page 251 and 252 of his book describes that what we percieve with our eyes as being 'soda ash' may actually be something else. He says it could be of at least 3 different materials (sodium carbonate, sodium hydroxide, and soap crystals that have separated from the main body of soap). He goes on to say that it can also be some other kind of water soluble material different from the afforementioned 3, or residue from impurities that are not soluble in water or ethanol. He provides testing measures in his book using water and ethanol to help rule out/determine what it may or may not be (some will be soluble in only water, some will be soluble in only ethanol, and some won't be soluble in either).


IrishLass :)
 
I don't know if I did it right but the steam method didn't work for me. :( I only tried it once though.
 
Stinkydancer said:
I don't know if I did it right but the steam method didn't work for me. :( I only tried it once though.

It didn't work the first time I did it, either. You kind of have to hold it on there for a bit, and you can actually see the ash bubble up.
 
My very ashiest soaps were made with wine--I was giving it a try for Valentines Day, and these soaps have a layer of ash that is... frightening. Two batches, no scent, regular, non-spectacular formula. Maybe I'll try steaming them...
 
you can actually see the ash bubble up.
What bubbles are you talking about ? I see no bubbles ...

All that I see is the surface of the soap getting wet. If I leave it for a longer time, it gets really moist, and it forms a whitish liquid which drips down.
 
saltydog said:
I saw MeadowHillFarmCT had posted the vids in another thread, so I gave it a try last night on some of my soaps with the thickest ash.
I thought I'd post my results, so everyone could see that it did make a big difference. I have a Shark steamer, and it was a bit sticky working with the soap, but I think the end result is worth it!
Before:


Uploaded with ImageShack.us

After steaming:


Uploaded with ImageShack.us
These are dried overnight, they are left with a nice sheen instead of ash, hopefully you can tell from my photos!

They look awesome - well they did before too. I have a shark steam buggy that I will use when I drag all my soap out and have a soap steam cleaning day...


As a side note:
I posted this info for everyone to have options to get rid of ash if they wanted to. It was more about techniques and visually seeing the different methods and how they worked. I wasn't recommending the videos for any other reason or promoting anyone as an expert in the matter of why and how ash is developed.
 
Fragola said:
you can actually see the ash bubble up.
What bubbles are you talking about ? I see no bubbles ...

All that I see is the surface of the soap getting wet. If I leave it for a longer time, it gets really moist, and it forms a whitish liquid which drips down.

I tried this over a steaming tea pot before I found my Shark steamer. It's a little tricky, because the soap gets slippery and you have to hold it against the steam long enough to see the bubbling start.
I wore my heavy yellow soaping gloves so I didn't burn myself. The tea pot method was very effective as far as bubbling up the thicker ash than the Shark, but the gentle steam works fine on soaps with a light ash cover.

Either way, the soap does get very wet, but it looks fine after it dries.
 
Hmmm. These methods look pretty intriguing. Especially the alcohol. I've always just buffed my soaps with a wet towel. Polishes them up beautifully and dissolves any ash. Is there an advantage to these methods over that? Does this prevent ash from reappearing?
 
The "chemistry" in the first video reeks of nonsense. Tell me how the moisture in a more dense soap can evaporate before coming in contact with the air...

But I like knowing there's something that can be done after the fact other than washing the soaps.

I spritz problematic soaps with rubbing alcohol when they are set up in the mold. 2-3 layers. Leaves soaps glossy, though, which I don't necessarily like.
 
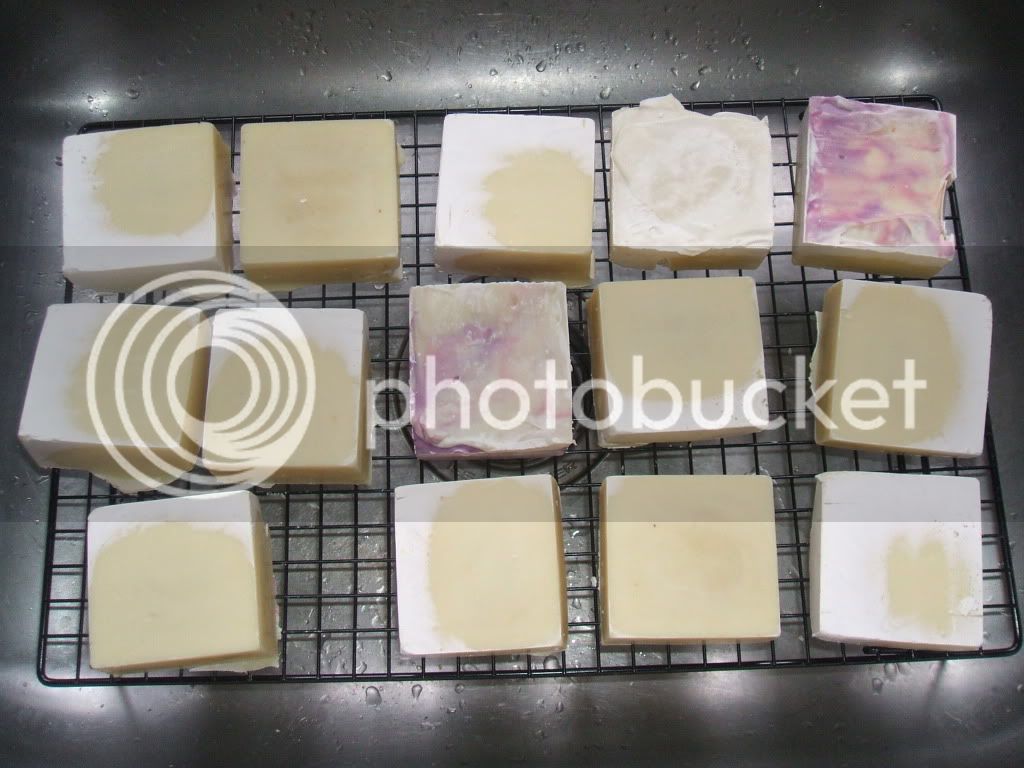
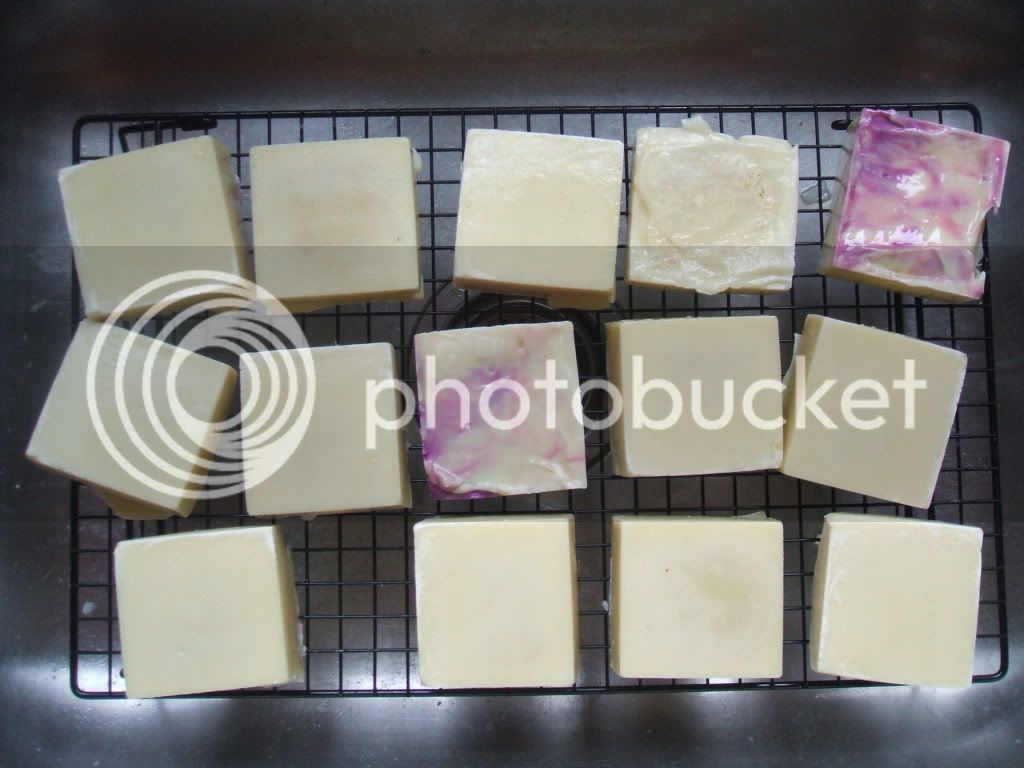
Okay so here are my soaps. I thought at first the white was non-gelled soap on the outer edges but now know it was ash. The air was humid in the house when I made it. I placed my coated wire drying rack in the sink so I didn't have to touch the soap. I had to fill the Shark steamer reserve twice. It doesn't hold much water (it's the little hand-held version). It took longer than I expected to steam them and if this happens again I will try the alcohol spritz first. I can't even imagine holding a bar of soap over the teapot one at a time! I am happy with the result. My soap is saved!

Before:
DSCF6521.jpg


After:
DSCF6523.jpg
[/url]
 
Back
Top