Geek Tips

Soapmaking Forum

Help Support Soapmaking Forum:

This site may earn a commission from merchant affiliate links, including eBay, Amazon, and others.
I've wondered too. She had some serious health problems. She is a lovely person and had some great insights and advice. It would be a pleasure to see her presence here again!
 
Thank you very much for the pdf topofmurrayhill! I will read it when I have time. I'm in a period that I will make a Castile (or a Bastille with little CO) with a rancid Olive oil so this paper might help me even more.
 
Last edited:
Well I have another question regarding the use of boiling brine water in order to clean a very old oil so as to make soap without any odor.
Can this also be done with an old Shea Butter that has started to smell weird(rancid)? Or with this method we are going to clean also the unsaponified matter it has that makes Shea a special Butter to use in a soap?
Are the unsaponifiables water soluble also?


Well yesterday I cleaned 3 times a very old olive oil with brine hot water and when I discarded the brine the oil itself was and is still cloudy. Does it need any filtering prior using it for soap making? Is this phenomenon for the moisture that the brine water added? Or is it ok to make soap right away?

I'm sorry for making this geek information thread into a "Why" & "How to" questions one.
 
After three washings, I'm going to guess the cloudiness is probably residual water.

You can make soap with it as it is. Or you can let it sit for a time -- a few days, a week? -- at room temperature and see if more of the water separates out. Or you can heat it gently to drive off the water and see if that helps the clarity.

I'd probably let it sit at room temp and see what happens, especially if I didn't have any particular reason to soap with it right away.
 
Well I have another question regarding the use of boiling brine water in order to clean a very old oil so as to make soap without any odor.
Can this also be done with an old Shea Butter that has started to smell weird(rancid)? Or with this method we are going to clean also the unsaponified matter it has that makes Shea a special Butter to use in a soap?
Are the unsaponifiables water soluble also?


Well yesterday I cleaned 3 times a very old olive oil with brine hot water and when I discarded the brine the oil itself was and is still cloudy. Does it need any filtering prior using it for soap making? Is this phenomenon for the moisture that the brine water added? Or is it ok to make soap right away?

I'm sorry for making this geek information thread into a "Why" & "How to" questions one.

That is exactly what happened when I tried it. I made some effort to get rid of the water but didn't have much success. The haze was quite stable and didn't show signs of separating on its own any time soon.

You would be weighing a little water if you use the oil but I suppose it's not very much. Maybe I should have used mine, but I didn't. I concluded that vigorous shaking might not be a good idea when washing with brine.
 
Geek Tip -- Pricing your work

The topic of pricing your work might not seem overly geeky at first glance, but it's an issue that can seem overwhelmingly complicated and frustrating. (Isn't "complicated and frustrating" part of the definition of "geek"?)

It's been my observation from years of being around custom leather workers, wood workers, soap makers, and other artisans that they often price their work too low. The end result is many can't earn enough to even make a living wage. It's hard to stay in love with what you do if that is the situation, and many people give up and burn out.

Part of the problem is the complexity of coming up with all the costs -- labor, materials, taxes, utilities, paperwork, insurance, repairs, etc. The list goes on and on. Often people just give up trying to figure it all out and go back to pricing by the seat of their pants. The other big part of the problem is that many artisans lack the confidence to set a fair value on their services, expertise, and products.

This guy offers a simpler approach that is worth a look: https://makesomething.tv/how-price-your-work-simple-technique

Same video on YouTube: [ame]https://www.youtube.com/watch?v=Uu_qFDanGPY[/ame]
 
Last edited:
Well that's certainly food for thought! I NEVER considered a daily rate as opposed to an hourly rate. I've read so many articles that talk about different hourly rates depending on the task you're performing. For example, building in $30 per hour for making soap but only $8 per hour for packaging the soap. But what about studying & researching soapmaking and developing recipes? Time spent in comparison shopping for supplies? Every artisan, no matter their craft will spend time on current trends and fashions in their field. Freebies I guess.

Then there's the standard method of retail. Cost of goods doubled for whosesale, quadrupled for retail.

Very interesting concept so thank you for posting DeeAnna!
 
DeeAnna thanks for the post.
I don't sell or plan to but I did "grow up" in an industry that required being able to do a realistic cost effectiveness analysis. The question was always: "is it going to cost more than it's worth to build this?".
When pricing what I do I wanted to use my wages. A kind gentleman pointed out that my costing rate was nearly twice what my pay stub showed.:shock:
Using the doubling method tends to short the costing of research, testing and design ( all overhead expenses) that is involved in a craft so one should charge for doing those things IF the objective is to make a living wage after all expenses are considered. Getting supplies is also a part of the overhead costs. Production can't happen without the supplies - BUT - once the R&D has been done and recipe(s) are settled on materials are easy to order and keep the chain going.

Bottom line is that start up costs are more hobby and production costs will be lower.
 
Geek Tip -- Photographing your soap

Ever wondered how to take better pictures of your soap? Here are some really helpful tutorials about the art and craft of photographing small items such as jewelry, ceramics, food, and, yes, even soap.

Serious Eats http://www.seriouseats.com/ is a great place to learn about great food. What's even better (from my geeky perspective) is they often talk about the science and technology that makes good food so wonderful -- how and why to cook food properly, why well cooked food tastes so good, and how to make it look as good as it tastes. The theme of a 2015 newsletter was food photography. As I read the article and looked at the pictures, I thought their tips applied nicely to soap as well, if you don't mind translating a bit from their food-based slant. Article: http://www.seriouseats.com/2015/03/beginners-guide-to-food-photography.html

The following tutorials (except for the last one) were originally hosted on the Handmadeology.com website, but many of the tutorials have been removed from the internet and the ones I could find now have missing photos or other problems. I am providing the intact articles here as an educational resource for other soap makers who want to take better photographs of their soap. All tutorials were written and photographed by Mariano, the owner of ViaU Photography and Mariano Photography. He is based in New York City.

"Taking Pictures of Your Ceramic Pottery" Learning the basics of using reflected and direct light for an effective product photo. http://classicbells.com/soap/photoTips/photoTips1.pdf

"Studio Quality Product Photography With a $12 Set Up" Making simple aluminum-foil reflectors and using them with natural light from a window. http://classicbells.com/soap/photoTips/photoTips2.pdf

"Creating a White Background Inside a Cardboard Box" Making and using a three-sided "white box" for photographing small items. http://classicbells.com/soap/photoTips/photoTips3.pdf

"Cut, Wrap and Make Your Silver Jewelry Shine" Using one light source and multiple reflectors to enhance product photos. http://classicbells.com/soap/photoTips/photoTips4.pdf

"A $6 Dollar Solution to Photographing Jewelry" Using a black or white reflector to control the quality of reflected light and shadows. http://classicbells.com/soap/photoTips/photoTips5.pdf

"Product Photography, Sometimes It's All Done with Smoke and Mirrors" Using a reflector behind a transparent product to enhance its transparency. http://classicbells.com/soap/photoTips/photoTips6.pdf

"How to Use Daylight and Flash to Make Your Products Stand Out" Using natural and reflected light to take effective product photos in outdoor settings. http://classicbells.com/soap/photoTips/photoTips7.pdf

Someone mentioned this thread the other day, and I thought I should add to it again. The topic of eggs in soap come up from time to time. I've come up with a method that is fairly easy, simple, and reliable. Here it is --

Adding eggs to soap

I suggest 1 whole egg or 1-2 egg yolks or 1 egg white per pound (or per 500 grams) of fats.

1 large whole egg supplies 5 grams of fat and 38 grams of water.
1 large egg yolk supplies 5 g of fat and 9 g of water
1 large egg white supplies zero fat and 29 g of water​

To account for this added water, use your usual lye concentration (or water:lye ratio) to calculate the total water needed for the soap batch. Next, calculate the total water added by the egg. Finally, subtract the water in the egg from the total water in the batch. This is the additional water needed for your soap recipe.

A whole egg or egg yolk per pound (or 500 grams) of fats adds only a small amount of fat to the recipe. Whether you ignore this added fat or not is up to you. Most soap recipe calculators do not have an entry for egg fat, but it has the same saponification value as canola oil. Enter 5 grams of "canola oil" for every egg yolk in the recipe. This will trick the calculator into calculating the correct weight of NaOH for your recipe.

IMPORTANT: All ingredients should be at room temperature to slightly warm (below 105 F or 40 C).


Crack the egg(s) into a small bowl. If you want just the yolks or whites in your soap, separate the egg and reserve the unwanted part for another use.

Stick blend the egg until smooth. There is no need to pick out the chalaza (the white ropy bit on one side of the yolk) or any other membranes.

Check that the fats are cool enough. Pour the blended egg into the fats. You can pour the egg through a strainer to catch any small bits the stick blender missed.

Stick blend for a few seconds to bring the eggs and fat to a consistent temperature. The mixture will quickly separate after you stop mixing, but that is okay.

Make sure the lye solution is cool enough. Add the lye to the fat and egg mixture. Make the soap as normal. Right after adding the lye, the batter may darken and there may be an ammonia or "rotten eggs" odor for a short time. These changes are typical.

Allow the soap to saponify. I do not insulate the mold nor add extra heat (CPOP, heating pad, etc.) I only lightly cover the mold to help the surface of the soap stay a bit warmer and keep the dust off. My goal is to let the soap warm up slowly on its own.

Even without insulation or extra heat, all my batches of egg soap have gelled. There have been no lingering odors or unexpected color changes.

By blending the eggs with the fats and soaping on the cool side, I have noticed only a small whiff of odor right after adding the lye, but I have not observed any weird colors, hard lumps, or lingering odors that other soapers sometimes mention.

More: https://classicbells.com/soap/eggSoap.html
 
Last edited by a moderator:
Geek Tip -- First aid for Lye Burns

For the sake of those who may have heard to use vinegar to treat a lye spill on your body -- that advice is absolutely wrong!

Never, never, NEVER use vinegar on a lye splash anywhere on your body. Rinse with plenty of plain cool running water.

***

The correct first aid if you get lye (NaOH or KOH) or raw soap batter on the body is this -- Rinse with plenty of plain cool running water. If you don't have access to clean water, rinse in the nearest mud puddle -- but you have to rinse!

You have SECONDS to react, so MOVE FAST. The quicker and more thoroughly you get the lye rinsed off, the better. Rinse for at least 10 minutes. Remove contacts and contaminated clothing as soon as possible. If the lye is under the fingernails or in other crevices, gently scrub and clean those areas carefully to remove all traces of lye.

If the burn is in or near the eyes, nose, or mouth or is a deep or large burn, see a doctor or emergency room for treatment immediately after you have rinsed well with water.

Treat small, mild lye burns just as you would any second degree burn. Keep the wound covered and moist with a water-based product. Do not use oily salves, butter, or other fatty stuff on any burn.

***

The geek explanation of why using vinegar is a Very Bad Idea --

Vinegar, an acid, does indeed neutralize lye, an alkali, but there are serious downsides to doing this kind of chemistry directly on the body.

First, the your skin is already being damaged by the lye. Alkali burn ... ouch!

Adding vinegar to the lye will trigger that neutralization reaction, which releases plenty of heat. If you know how hot your lye solution gets right after you mix the lye with water, you know exactly what I'm talking about. Thermal burn ... ouch!

On top of that, the vinegar itself, being acidic, will irritate the body tissues already injured by the lye and the heat. Acid burn ... more ouch!

All this damage results in intense pain and possibly a deeper, slower healing wound. Yikes!

To make matters worse, lye is a strong alkali and vinegar is a weak acid, so you need to use lots of vinegar in proportion to the amount of lye on the body. If you don't use enough vinegar and don't rinse long enough, the lye will remain active and continue to do its damage.

So if you want an alkali burn + a heat burn + an acid burn + major pain + a slow healing wound ... then by all means, use vinegar.

I will stick to plenty of cool running water, thank you very much!

***

If it makes you feel better to spray vinegar around your work area and to rinse your utensils with vinegar, then do so. You aren't going to harm anything by using vinegar on non-living things. That said, just a good rinse with water is really all that's needed for them as well.

For cleaning soapy or oily bowls and utensils that may have active lye on them, I wipe the items with old towels to remove excess soap and oil residues and then rinse the items well with water. I use a synthetic detergent cleaner like Dawn and hot water to do a final wash.

The soapy/oily/alkali-covered towels go into a plastic bucket far out of reach of curious human hands and critter paws. Once the residues have had a day or so to saponify, the towels gets washed with dirty chore clothes.

Everyone has a favorite way of cleaning up their work area and equipment after soaping; this is just my method.

Please, please, please post this on your website, pretty please? I really need to be able to point people to it!
 
Geek Tip -- The difference between high-, mid-, and low-oleic oils

Safflower and sunflower oils are sold in high oleic, mid oleic, and linoleic (regular low oleic) versions depending on the amount of oleic acid in the oil. The differences in the fatty acid content comes from natural variations in sunflower and safflower plants. These differences have been enhanced by conventional plant breeding methods.

Regular low oleic (aka linoleic) oils contain mostly polyunsaturated fatty acids -- specifically linoleic and linolenic acids. These fatty acids become rancid fairly quickly in storage and break down quickly when heated. Mid oleic and high oleic oils contain at least 50% oleic acid, which is a more stable monounsaturated fatty acid. These higher-oleic oils will not break down as fast when used in the kitchen for frying and sauteeing. They work better in soap because they are not as prone to becoming rancid (also called DOS, dreaded orange spots). High oleic safflower or sunflower is a good substitute for olive oil.

So how to tell the difference? First, check the label for phrases such as "good for frying or sauteeing" or "high temperature" or even "high oleic," all of which will tell you the oil is a high oleic version.

If you don't see any helpful information like that, then use the nutrition information to calculate an answer --

% oleic (monounsaturated) = (grams monounsaturated fat per serving) / (grams total fat per serving) X 100%

If the monounsaturated fat is above 75%, it is a high-oleic oil.
If it is between 50% and 70%, it would be a mid-oleic oil.
If it is about 20%, it would be regular (linoleic) version.

This is so so helpful. Never can understand the actual meaning of soaping oil properties. Thank you DeeAnna
 
Please, please, please post this on your website, pretty please? I really need to be able to point people to it!

It is there already, Susie -- look in the sections on Lye and also on Safety and First Aid. https://classicbells.com/soap/lyeFirstAid.html

Calculating a dual lye recipe

Some soap makers use two alkalis -- sodium hydroxide (NaOH) and potassium hydroxide (KOH) -- to make some types of soap. In the hand crafted soaping world, "dual-lye" recipes are often used for making cream soap, shave soap, and liquid soap.

Dual-lye recipes are uncommon for hard bar-soap recipes, but I have learned a blend of 5% KOH and 95% NaOH reduces the stringy, gelatinous goo of a 100% olive oil soap (or other soap high in oleic acid). I have found this same smidge of KOH increases the solubility and lather of bar soap high in tallow, lard, or palm oil (in other words, soap high in stearic and palmitic acids).

The key to remember is the percentages are based on a specific total number of alkali molecules. Because a KOH molecule weighs 1.403 times more than an NaOH molecule, a soaper must allow for that weight difference so the batch gets the correct total number of alkali molecules to make good soap.

Calculate the weights of KOH and NaOH

Let's say you want make a dual-lye soap using 95% NaOH molecules and 5% KOH molecules. How can you calculate the correct weights for KOH and NaOH? The easiest way is to let a dual-lye recipe calculator do the work. Two suitable soap calculators are the Summer Bee Meadow Advanced calculator and the Soapee calculator. If you have not used either calc, I recommend http://Soapee.com

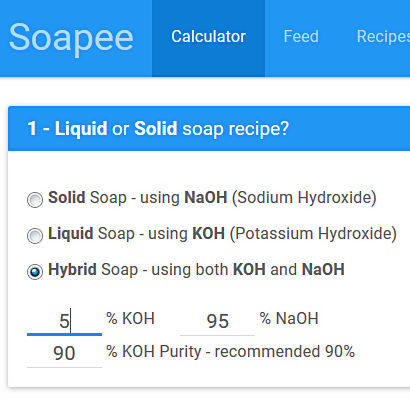
To start a dual-lye recipe in Soapee, click the button next to the "Hybrid Soap" option in Section 1 --

soapeeSec1.jpg

Click next to the "% KOH" option and type the percentage of KOH you want in your recipe. Soapee will calculate the percentage of NaOH for you. Or vice versa -- either way works.

Enter the KOH purity. If you don't know the purity, check with your supplier. If the supplier does not provide that information, I suggest using 90% KOH purity, since KOH is often about that pure.

Continue entering the information for your recipe -- units of measure, water, superfat, and fragrance. To enter the fats, double click on the name of your first fat. New windows will appear. One will show the properties of the fat and another will allow you to enter the percentage or weight of that fat in your recipe. The finished recipe will appear below as fats are added.

Calculate the weight of extra alkali if you also add an acid to dual-lye soap

Some people add acids to their soap. Any time you add an acid to soap, the acid will consume some of the alkali, so there will not be enough alkali left over to fully saponify the fats according to your recipe. The solution to this problem is to add the extra alkali that the acid needs. For a dual-lye recipe, here is a simple way to calculate this extra alkali --

Look for the Acids section here -- https://classicbells.com/soap/soapyStuff.html -- to get more information about the acid you want to use. Decide what kind and how much acid you want to add to your batch. Calculate the NaOH (sodium hydroxide) needed to react with this acid.

The total weight of NaOH needed for the recipe --

Total NaOH wt = NaOH for acid + NaOH for saponification​

The KOH weight will not change --

Total KOH wt = KOH for saponification​

Make a lye solution with NaOH and KOH


Wear your usual safety gear for working with lye. At a minimum, please use protective gloves to protect your hands and either chemical splash goggles or a face shield to protect your eyes. Make sure your work area has good ventilation or work outdoors. First aid for lye: https://classicbells.com/soap/lyeFirstAid.html

If you are using solid NaOH and solid KOH, weigh out each alkali. Add one alkali to the water-based liquid in your recipe, and mix until that alkali is dissolved. Add the second alkali and mix until it too is dissolved. (It doesn't matter which one you use first.) Add the lye solution to your fats and make soap as usual.

To use a masterbatched 50% NaOH solution, here is how I usually proceed: Weigh the correct amount of the 50% NaOH solution to get the proper amount of NaOH for the recipe. Set this container aside. Weigh the additional water-based liquid needed for the recipe in another container. Weigh out the solid KOH. Add the KOH to the container of water-based liquid and stir until the KOH is dissolved. Pour the containers of 50% NaOH solution and weak KOH solution into the fats and make soap as usual.

Caution -- The weight of water-based liquid to make the lye solution(s) must be at least equal to the total weight of alkali (NaOH + KOH). You can use more water, but you cannot use less. If you try to use less, the alkali will not completely dissolve.

More: https://classicbells.com/soap/dualLye.html
 
Last edited by a moderator:
Water:Lye Ratio and Lye Concentration Conversion Table

I've added a handy table to my website that converts from lye concentration to water:lye ratio or vice versa. The math behind the table is also included at the end.

Since SMF posts don't handle tables very nicely, I've attached a PDF of the table so you can print or save it.
 

Attachments

  • classicbells.com Water conc WaterLye ratio.pdf
    40.1 KB
Back
Top